Methods you can use to check your Mac’s performance
If you are an Apple user, especially Macbook, you must have encountered a performance issue at least once. As per NYPost, the average Mac users are reported to have minimum 708 unread emails and 298 unused apps, which must be running in the background and resulting in a slow system performance.
It is obvious that technology is complicated, despite advancements some issues can only be resolved by performing conventional methods. So, are you still facing performance problem in your Macbook? If yes, then this article is for you.
In this write-up, you will learn some prominent methods you can use to check your Mac’s performance, identify the issues, and then troubleshoot the potential challenges. From a guide to use the Activity Monitor to useful benchmarking apps, find everything here!
Let’s read more.
KEY TAKEAWAYS
- Use the Activity Monitor to check the CPU and memory loads, along with network and disk usage access, and you don’t need to pay any additional charges.
- A system information/ system report gather performance info regarding your Mac, including battery health and storage information.
- Remember Apple Diagnostics as the master key made by Apple to detect the potential errors, which will ultimately help to fix them.
- Console provides every diagnostic reports and inherit data, especially useful for engineers, developers, and system administrators.
- Many benchmarking tools are available in the market, in which Blackmagic Disk, Cinebench, Geekbench 6, and Novabench are the most common.
Use the Activity Monitor
Apple continually offers a great tool for performance checkups in the form of the Activity Monitor. The tool will predominantly allow you to check the CPU and memory loads, but also network and disk usage, or energy consumption. It genuinely is an extremely useful solution if you want to narrow down performance problems, and it undoubtedly ensures that you get the best possible outcomes and experience.
A very common reason why you want to use this tool is the fact that it’s readily available on your Mac. There is no additional charge, and the information is quite beneficial. Granted, it only shows info, but you still need to manually take action, and doing that can prove to be great in the long run. That’s why it’s worth taking into account.
System Information/System Report
Known under these two names, it’s the same tool. The objective here is that you can determine information about your hardware. It primarily shows battery health and storage info, but also memory info. Along with it, you can access this from the System Settings, General, and then About/System Report. Obviously, it is one of the better tools you can use to gather performance info regarding your Mac. Not only is it great info, but the value you obtain here is quite impressive. We can actually consider it as a tool that has a lot to offer.
Did You Know?
According to a 2023 report, there were more than 100 million active Mac users in the world, increasing every year.
Apple Diagnostics
The Apple Diagnostics tool was created by Apple and is the successor to the previous Hardware Test made by Apple. It was made with the intention of checking hardware for vulnerabilities. On rare occasions, your MacBook performance is not ideal, and it could be affected by related hardware issues or failures. If you think that might be the case, it would make a lot of sense to focus on using this tool. It would possibly tell you what’s wrong, and maybe even fixing the error becomes a lot easier.
Just start up, press and hold the power button as you are opening your Mac, and then release the Power button as the Startup window is displayed. At this point, you need to press Command and D at the same time to run the Diagnostics tool.
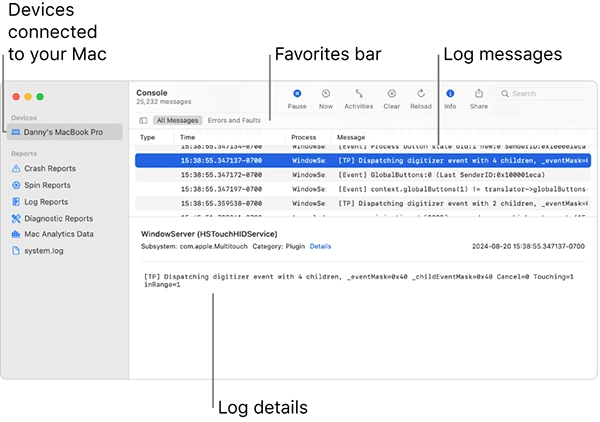
Console
The Console is very useful for various things; in this case, it allows you to see the crash reports and logs. It clearly helps you with that, and it makes the experience easier. Through this, you can see all the diagnostic reports, and that data can be inherently helpful. With that being said, it’s more of a tool for people who know how to interpret the data.
It’s slightly more than a tool for engineers, developers, system administrators, and so on. Being able to view logs in real time is very handy, and it’s one of those assets that can bring you exceptional value. With that in mind, logs can get updated if new complications arise, and you can retrieve that info or new reports/logs as they appear.
Use one of the various benchmarking apps for Mac
A ton of benchmarking tools are available for the macOS platform. For whatever reason, you need more than the standard functionality offered by the apps shown above, there are separate choices of apps made by third parties that could help. What’s exceptional is that you can easily access a plethora of newly released features and information with those tools. The primarily utilized tools for benchmarking your Mac include:
- Blackmagic Disk Speed test can be ideal if you want to analyze the reading and writing speed of your storage drive.
- Cinebench tests your graphics card and CPU performance, as it tries to simulate a complex 3D scene.
- Geekbench 6 is available with a multitude of tests, and it’s tailored to narrow down performance for routine tasks that you would do daily.
- Novabench is one more useful tool, seeing as it benchmarks the entire system, from the graphics performance to CPU, RAM, and many others. It presents you with the means to run speed tests very fast, too!
To optimize your Mac’s performance and eliminate any unnecessary or undesirable files, it is advantageous to implement a Mac cleanup utility. The challenge here comes from narrowing down what apps are competent for you and giving them the type of info you need. The more you know about your device, the better it is going to be. However, the last thing you want is to rush, since you want to sort through all the info. And once you have that info, it will make the process a lot easier!
Ans: You can use the Activity Monitor to check your Mac’s performance. Access it by simply following: Finder > Applications > Utilities > Activity Monitor.
Ans: Depending on the factor of how deeply you want to dig, it can take from a few minutes to over an hour.
Ans: The primary benchmarking tools for Mac Issues are Blackmagic Disk, Cinebench, Geekbench 6, and Novabench.
Ans: Apple Diagnostics is basically used for troubleshooting and identifying potential hardware breakdowns on their Apple devices.