Edit Your AI-Generated Images for Free in 2026
AI has truly changed the way people used to edit an image in the past few years. Editing that used to take days can be done in less than an hour and that too without putting in effort. Now, with the help of AI tools, users can tweak or change photos completely within seconds.
You might be thinking, how does it work? The core technology that drives the process is known as Image to Image AI. It helps users to improve and change their image visuals using the power of AI (Artificial Intelligence). After this, the real magic is done in the editing part. The way AI implements your prompts and makes changes.
Moreover, all this can be available to you for free. Keep reading this article that provides you the top Free AI Photo Editor tools along with a step by step guide to edit those photos.
Why Do AI-Generated Images Need Editing?
AI image generators are truly powerful and advanced, but they aren’t a one-size-fits-all solution. They understand text prompts and visual data to create an image from nothing, which can sometimes result in unusual mistakes. Understanding these common issues will help you spot and fix them –
Common issues include:
- Unusual Anatomy: Typical AI tells include hands with an excess number of fingers, weak muscles, or odd postures.
- Background Issues: You might find deformed objects, illogical shadows, or artwork hiding in the background.
- Inconsistent Textures: Sometimes, a texture like wood grain or fabric might look odd or boring.
- Color and Lighting Problems: The whole lighting might feel dull, or the colors could be washed out or overdone.
- Framed Weakness: The main topic might not be perfectly set up, or the image could feel uneven.
Editing isn’t about fixing failures; it’s about adding a human touch. It’s the final 10% of the work that moves your image from a cool AI creation to a polished work of art.
Top Free Tools for Perfecting Your AI Images
You need tools that are both powerful and user-friendly when editing AI-generated images. While many options are available, a select few stand out for their focus on AI-specific issue. Here are our top recommendations for 2026 –
#1 Pick: EZRemove’s Free AI Photo Editor
For an all-in-one solution, EZRemove’s suite of instruments is our preferred choice. It’s designed specifically for the kind of clean-up and improve work that AI images require. It packs many key functions into one simple platform, making it perfect for both beginners and experienced creators.
Key Features:
- AI Object Removal: This is its unique feature. You can easily paint over unused elements, like a blurry background object or an extra finger, and the AI will skillfully fill in the space with a seamless, context-aware background. It’s incredibly effective for fixing the most typical AI issues.
- Background Replacement: Want to place your AI-generated character in a different scene? The tool lets you remove the entire background and swap it with something new, all without hours of manual selection.
- Smart Enhancement: With a single click, you can enhance the overall color balance, brightness, and contrast. This feature is great for making images feel more alive and realistic.
- Upscaling: AI generators sometimes produce lower-resolution images. The upscaler increases the image size and sharpness without adding distracting artifacts, making your work suitable for printing or high-resolution displays.
This tool’s simplicity is what makes it so powerful. You don’t need to use detailed layers or menus. The interface is easy to use, allowing you to quickly find a problem, select a tool, and see live results.
#2 Pick: PhotoEditorAI.io for Advanced Rerendering
While our top pick is for editing, PhotoEditorAI.io is an exceptional tool for the initial creation and for making targeted adjustments through rerendering. It excels at the image-to-image process, which you can use as an advanced editing technique.
How It Works for Editing:
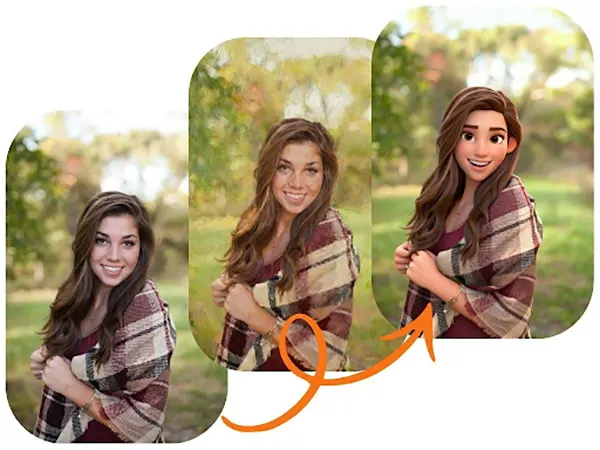
Instead of just eliminating an object, you can use a feature called “inpainting.” You can create a new text prompt just for the portion of your image that is hiding, such as the face of a character or an article of clothing.
For example, if your character’s expression isn’t very right, you can mask their face and write a prompt like, “smiling woman, happy expression.” The AI will then remake only that part of the image to match your new instruction, keeping the rest of the picture as is. This gives you amazing control to fine-tune details without starting over from scratch. It’s the perfect partner to a traditional photo editor.
A Step-by-Step Guide to Editing Your AI Photos
Ready to start polishing your creations? Here’s a simple workflow you can follow using the free tools we’ve recommended. This will not just help you understand the flow but also share the effective practices to bring into daily use.
Step 1: Analyze Your Image for Flaws
Open your image and look at it with a critical eye. Zoom in and check for the common issues mentioned earlier. Pay close attention to hands, eyes, background elements, and shadows. Make a mental list of the 2-3 biggest distractions you want to address first. Don’t aim for pinpoint accuracy on the first pass; just focus on the most visible problems.
Step 2: Clean Up with an AI Object Remover
Start with the basic ones. Use a tool like EZRemove’s AI object remover to erase any glitches. Choose either the strange-looking hand, the floating object in the background, or the blurred texture. The AI will analyze the surrounding pixels and generate a patch that blends right in. This small but effective step can often make the biggest improvement to your image’s quality.
Step 3: Adjust Color, Light, and Contrast
Once the glitches are removed, focus on the tuning of the image. Does it look dull or flat? Use an auto-enhance or color correction tool to adjust the color, brightness, and contrast. Small tweaks can make a huge difference. Your goal is to make the lighting look natural and the colors feel balanced. For example, if the shadows seem too dark, you can selectively lighten them to bring out more detail.
Step 4: Refine Details with Inpainting
For more complex issues, like changing a facial expression or altering an outfit, turn to an inpainting feature. Mask the area you want to change in a tool like PhotoEditorAI.io. Write a clear, concise prompt describing exactly what you want to see. This is a powerful technique for taking creative control over specific parts of the image without affecting the rest of the composition.
Step 5: Upscale and Export
After you’re happy with your edits, the final step is to make sure the image is sharp and high-quality. If your original image was small, use an AI upscaler to increase its resolution. This will prepare it for sharing on social media, adding to a portfolio, or even printing. Once it’s upscaled, export the final version.
Fixing Common AI Image Problems
Let’s look at a few specific problems and how to solve them.
The “Weird Hands” Problem
This is perhaps the most well-known issue with AI art. To fix it, you have two great options. The first is to use an object remover to erase the hand if it’s not essential to the image. The second, more advanced method is to use inpainting. Mask the hand and use a prompt like “human hand resting on a table, detailed, realistic.” The AI will regenerate just the hand, often with much better results.
Unnatural Lighting and Shadows
Sometimes, an AI will place a shadow where it doesn’t belong or create lighting that feels inconsistent. Use a photo editor’s color correction tools to fix this. You can adjust the highlights, mid-tones, and shadows independently. For example, you can decrease the brightness of “highlights” to tone down overly bright spots or increase the brightness of “shadows” to reveal hidden details.
Removing Digital Artifacts
You might notice strange, pixelated patterns or blurry spots, especially in complex textures or backgrounds. A good cleanup tool can paint over these areas and smooth them out. The “heal” or “clone” stamp tools found in many editors are also useful for copying a clean texture from one part of the image to cover up a flawed area.
Conclusion: Become the Final Creative Director
The AI image editors are transforming the way people used to edit and charge money for normal editing. With free AI tools, users can now touch up their portraits, change or remove backgrounds or introduce new things to the image from scratch – just like a professional.
Choosing the right AI image editor will not just save your time for editing but also give you a chance to be more productive and help your images stand out.
Ans: AI image editor specifically is an editor tool that helps you edit images just by giving the prompt – with the help of AI.
Ans: Not necessarily; you can simply keep using any free AI editing tools and align with their updates to master them in a few days.
Ans: No, not every AI editing tool is free. Many are free for a lifetime, many offer limited free use and many ask for paid membership in the beginning only.