How to Recover Lost RAW Images from Your Digital Camera?
Jump To Key Section
- Part 1. What is the RAW Image Format?
- Part 2. You Can Recover RAW Photos with the Reliable RAW Photo Recovery Software Tool
- How to recover RAW images on Windows with ease?
- How do you recover RAW photos on the Mac computer?
- Part 3. Feasibility of RAW Photo Recovery on Mac or Windows
- Part 4. How to Stop Losing Your RAW Photos in the Future
In this article, we delve into the complexities of RAW images, aiming to demystify their intricate nature. You will learn how to recover RAW photos from a digital camera on both Windows and Mac computers. For a seamless and effective RAW photo recovery, we strongly recommend utilizing professional data recovery tools. Also, learn about How to Use AI Photo Generators to enhance your social media presence with this guide.
Digital cameras support a diverse array of digital picture formats, among which RAW, TIFF, and JPEG stand out as the most frequently used. RAW files, in particular, hold significant importance due to their inclusion of minimally processed photos, ensuring the preservation of quality in a lossless manner. However, various factors, such as accidental deletion, storage media failure, or corruption, can contribute to the loss or corruption of RAW images. To address such situations, prompt and appropriate data recovery measures are all-important. Utilizing professional tools and services increases the likelihood of successfully recovering lost or corrupted images.
Part 1. What is the RAW Image Format?

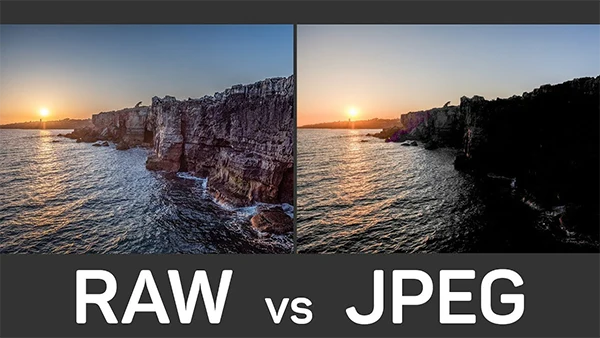
The RAW image format, crucial in digital photography, is known for its powerful and flexible nature. It was introduced in the early 2000s and has become a standard for both professional photographers and enthusiasts. Unlike other formats such as JPEG and TIFF, RAW files store unprocessed data directly from the camera’s sensor, giving photographers significant control during editing. This format is widely used in digital single-lens reflex (DSLR) and mirrorless cameras, with popular proprietary versions like Canon’s CR2 and Nikon’s NEF. The appeal of RAW lies in its ability to maintain original data, provide a wider dynamic range, and allow for detailed recovery in challenging lighting situations.
Photographers appreciate RAW’s flexibility for adjusting exposure, color balance, and contrast without compromising image quality. In contrast, TIFF maintains high quality but has larger file sizes, and JPEG is suitable for everyday use with smaller files but sacrifices some image quality. Facing the loss of RAW files can be disheartening. Explore the information below to grasp why recovering such images is feasible and discover the steps to retrieve deleted photos from your camera.
Part 2. You Can Recover RAW Photos with the Reliable RAW Photo Recovery Software Tool
iBoysoft Free Data Recovery software excels in handling RAW photo recovery arising from diverse situations, including accidental deletion, formatting errors, corruption issues, or other unknown factors. Its intuitive interface makes the restoration process accessible to users with varying levels of technical expertise, ensuring a seamless and efficient experience in retrieving RAW photos.
- Compatible with various RAW photo formats generated by leading digital camera manufacturers such as Canon, Nikon, Sony, Panasonic, Fujifilm, Olympus, Pentax (Ricoh Imaging), Leica, Samsung, and Hasselblad, the software ensures comprehensive support for a wide range of digital imaging devices.
- Featuring an advanced deep scan engine, the program is engineered to conduct thorough scans on corrupted, formatted, or damaged SD cards or hard drives, facilitating the recovery of RAW pictures with precision and efficiency.
- Offering an intuitive interface, the software enables users to navigate through files based on file types and preview them before initiating the recovery process, enhancing the speed and accuracy of data retrieval.
- With the capability to recover over 1000 file types, spanning graphics, documents, videos, audio files, archives, emails, and more, the software provides a versatile and encompassing solution for comprehensive data recovery needs.
- It serves as a robust RAW drive fixer, adept at repairing disks afflicted with a RAW file system. It seamlessly restores all RAW photos, ensuring the integrity of the recovered data (This feature is available in the Windows version).
- The software extends support for the restoration of RAW files from BitLocker-encrypted hard drives (The feature is available in the Windows version).
How to recover RAW images on Windows with ease?
1. Begin by downloading and installing iBoysoft Data Recovery for Windows on your PC, ensuring compatibility with operating systems starting from Windows XP.
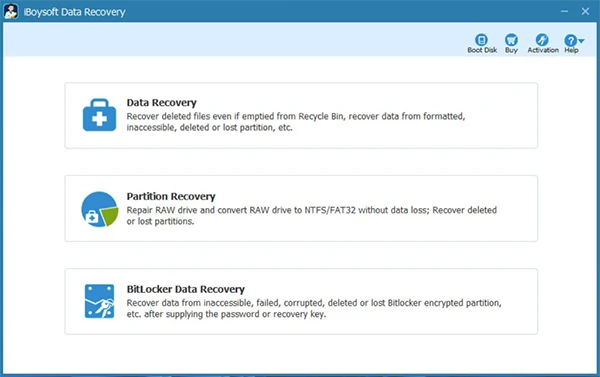
2. Connect your digital camera or SD card to your computer. Upon a successful launch of the data recovery software, choose an appropriate recovery module based on your specific data loss scenario (check out the picture below).

- Data Recovery module: This module serves the purpose of recovering files that have been deleted or lost due to various reasons, such as formatting, inaccessibility, RAW state, corruption, or deletion of partitions. However, iBoysoft Data Recovery cannot repair files that have been overwritten or corrupted.
- Partition Recovery module: Designed to address issues arising from a corrupted NTFS/FAT32 file system following a partition becoming RAW. Successful repair of the RAW partition leads to the recovery of all data, rendering the partition accessible. In scenarios where the file system is severely damaged, the recommended approach involves data recovery and subsequent drive reformatting. This module is specifically tailored to restore lost and deleted partitions, supporting NTFS, FAT32, exFAT, and BitLocker encrypted partitions. To ensure the successful restoration of a lost partition, it is necessary that, despite the loss of the partition table, the partition structure remains uncorrupted.
- BitLocker Data Recovery module: This module is employed for the recovery of lost data from BitLocker partitions that have encountered failure, corruption, formatting, or loss. To decrypt the data, the BitLocker Data Recovery module mandates either the password or the input of a 48-digit recovery key.
3. Identify and select the camera’s SD card, activate the Deep Scan option, and proceed by clicking Next.
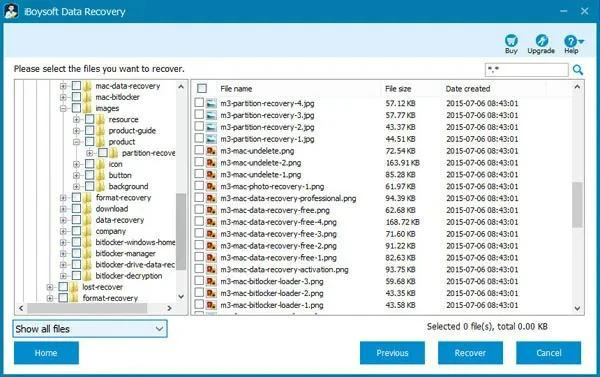
4. Initiate a search for RAW image formats and preview the files by double-clicking on them.

5. Choose the specific RAW photos you wish to recover by marking the corresponding boxes and then click on the Recover button.
How do you recover RAW photos on the Mac computer?
1. Begin by freely downloading and installing iBoysoft Data Recovery for Mac on your Macintosh computer. During the software installation process, grant the necessary permissions when prompted, ensuring a secure and trusted installation.
2. Connect your digital camera to your Mac, and upon launching the RAW file recovery software, locate and select your camera from the provided list.
3. Initiate the scanning process by clicking on “Search for Lost Data.” The software will promptly commence scanning for your misplaced RAW pictures.
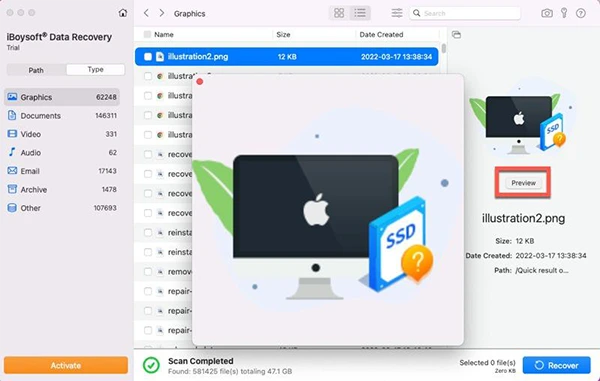
4. On the left side, navigate through files categorized by file type, or employ the search section to specifically locate a RAW image format of interest.

5. Select a file for a preview by clicking on it, then mark the pictures you wish to recover and finalize the process by clicking on the “Recover” button.
Part 3. Feasibility of RAW Photo Recovery on Mac or Windows
Recovering RAW files on your computer—whether from a camera SD card, external hard drives, or other disk-based storage devices housing RAW photos—is indeed possible. When a RAW file is deleted from your camera, the space it occupies becomes marked as available for new data. However, the original data persists on your SD card until overwritten by fresh information.
Therefore, to optimize the chances of recovering lost RAW photos, it’s significant to cease using the storage device immediately. Turn off your camera, and if applicable, remove the SD card promptly.
In situations where RAW images are lost from a camera, employing a robust data recovery program becomes imperative for the RAW file recovery process. These programs utilize sophisticated algorithms to scan your camera SD card, effectively retrieving deleted or lost RAW images.
For those who have accidentally deleted RAW files on a Mac or Windows computer, initial checks can be made in the Recycle Bin, Trash, or backed-up files to locate and restore the missing RAW images.
Part 4. How to Stop Losing Your RAW Photos in the Future
By adopting these preventive measures, you can safeguard your RAW photos and mitigate the likelihood of future data loss incidents.
- Establish a routine for backing up your RAW photo files to an external hard drive, cloud storage, or another secure location. This ensures a secondary copy is readily available in case of accidental deletion or hardware failure.
- If your camera supports dual card slots, utilize this feature to simultaneously save RAW files on two separate SD cards. This provides an immediate backup during photo capture.
- Exercise caution when deleting files, especially RAW photos. Confirm the selection before proceeding to avoid unintentional deletions.
- Keep reliable data recovery software on hand. In the event of accidental loss, having such software readily available can enhance your chances of successful recovery.
- Regularly update your camera’s firmware and any relevant software.


