Tips To Fully Remove Adobe Creative Cloud From Your Mac
For an artist, Adobe Creative Cloud is the cream of the crop in the apps and services market. You have everything to bring your creativity to life, and the quality of these amazing tools is unlike anything out there.
It has 20 interesting apps, it offers features such as Photoshop, Premier Pro, Illustrator, InDesign, Audition, and also After Effects. It is a complete subscription plan package with 100 GB of cloud storage.
However, when uninstalling this app, many people face some issues like a longer processing time or being unable to search for the right software to delete all files. Also, learn about Maximizing Productivity for Mac Users by reading this article.
In this article, we will explain all the steps to remove Adobe Creative Cloud from your Mac because you want to try another suite of tools.
Use A Mac Cleanup Tool
The advantage of using a Mac cleanup software is that all the tools are available in it to remove Adobe Creative Cloud (CC). Simply, select the app to uninstall, and then the cleanup tool will erase everything related to it.
That’s the great aspect, that it cleans all the bloatware related to the app, and it can lead to a much better experience.
Here’s how to uninstall Adobe CC completely:
Before removing, save all data
- Save all your important work in a different file on a hard drive to prevent losing them.
- Or sync all your folders to your CC account so that you can easily use it if ever you need to use it again.
Download and install the Mac cleanup tool.
- Log in with your Adobe CC username and password on Mac.
- From the features on the left side panel, click on Uninstaller to view all applications.
- Select Adobe from the list and then also select all the related apps. Click on the Uninstall button.
And you have successfully removed the Adobe Creative Cloud. If you are still having some deleting issues, you can reset the Mac from System Preferences.
However, there is another easier option available on the cleanup tool itself.
From the already open panel of the Mac cleanup tool, click on the reset button, and then once again select all the apps to uninstall.
The cleanup tool will also delete the remaining files from the Library folder and save them anywhere else on the Mac. It’s the ultimate way to clear it since usually there are many steps involved, which makes the process complex to do it all manually.
Use The Uninstaller
Obviously, the best approach here is to just try and use the uninstaller provided by Adobe. The problem is that it will remove most of the apps and their files, but not all.
Here are the steps to follow when using the Adobe Uninstaller:
- Open the Adobe Creative Cloud app.
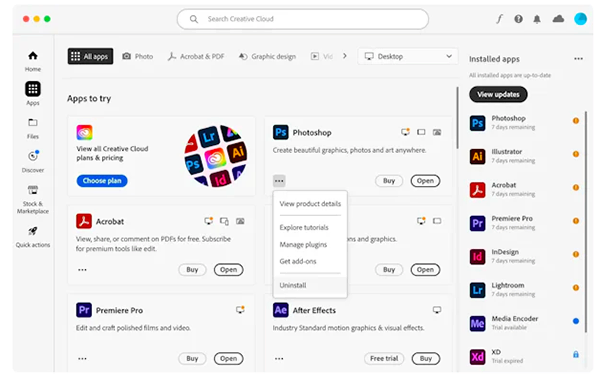
- From the above panel, select All Apps and search for all the apps installed on your Mac.
- After locating the app you want to remove, click on the ellipses or three dots which will show you the uninstall option.
- Click on uninstall and follow further instructions as guided by the system for complete removal.
There are still many junk files remaining there, so be very careful. You will have to visit the Library folder and any adjacent folders manually. That’s why we think having an automated tool to delete stuff becomes much easier.
Make sure you quit the Creative Cloud apps before deleting
If one of the Adobe Creative Cloud apps is still running, chances are that it will not delete everything, and that alone is going to be quite the problem. The best thing to focus on here is to try and enter the Activity Monitor on the Adobe app.
Here’s how to complete the deletion process:
- From Applications go to Utilities > Activity Monitor or you can use the Spotlight to open Creative Cloud.
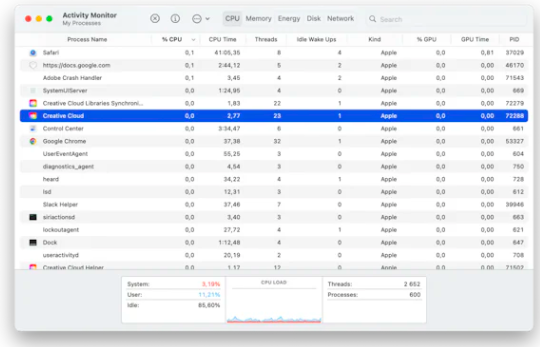
- If you see any processes running related to Adobe, simply select them and tap on Force Quit.
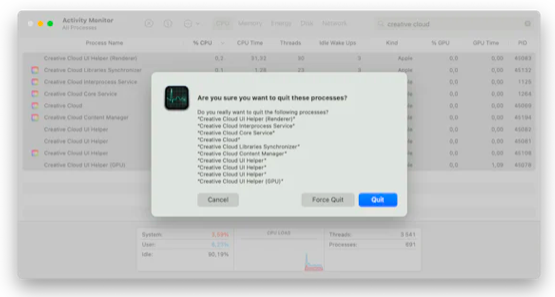
Once you do that, it will provide a much better result, reducing any complexity while uninstalling the app.
Go to the Library folder
As we said, this is where a lot of remaining files are found. Enter the Application Support folder > Preferences > Launch Agents, to remove everything related to this app.
In conclusion, using Adobe Creative Cloud is a great experience, but when it’s time to make the switch to other software, you can use the steps mentioned in this article to remove the app.